Showing posts with label How To. Show all posts

Tuesday, December 30, 2014

How To impress Girls

 Having a great personality and being easy to relate to is an important part of getting a girl to like you. Let's face it: Girls look for different things in guys than guys look for in girls. So let the great parts of your personality shine through to her, and work on fixing the parts of your personality that you don't like.
lifehacks.blogspot.in


  • Be funny. Girls love funny guys. If you can make a girl laugh, then you have a good shot at making her fall in love with you. Practice jokes on your friends (guy-friends and girl-friends, because there's a difference of what they find funny) and keep the jokes that work and throw away the jokes that don't.
  • Be playful. Studies have found that girls are attracted to guys who are playfulBeing playful is attractive because it shows youthfulness and the ability to have fun. So find your inner child, throw away all the ideas about what you think you should and shouldn't do, and play around, especially when you're with her.
  • Be interesting. Girls like guys who have interesting lives, and who do cool things for fun. As long as you're passionate about something, and you get involved in doing that or learning about it, you'll be more attractive in her eyes. No girl just wants to sit around and watch you play video games all day.
  • Be mysterious. A little mystery goes a long way. Don't let her in on every little thing you're doing. Hint more than you usually do, and downplay things instead of being really excited. Mystery will make you a puzzle in her book, and she'll want to solve you.


Tip # 1: Be in Control of Your Life.

Girls may not like you deciding what’s best for them, but they sure do admire a man who knows what he wants for himself. Guys who have long-term goals tend to fare better with girls than guys who don’t really know what to do with their life.
Even if you don’t have a clue where you’ll find yourself in 10 years, it is important that you at least have plans for the next few months. A guy who is in control of his own life will project an image of a successful, stable and impressive man.

Tip # 2: Go the Extra Mile.

Some guys ask girls out and bring them flowers on a date. But if you really want to know how to impress a girl, you won’t just let the florist do the arrangement for you. Instead, you do a little snooping around and find out what the girl’s favorite flowers are. Or if she’s into chocolates, what kind does she prefer?
Guys who go the extra mile are richly rewarded. You don’t have to show up on her front door with a limo and a chauffeur waiting in the background. The magic is all in the details.

Tip # 3: Be a Little Bit Mysterious.

Want to know a little-known secret on how to impress a girl? Mystery attracts women like nothing else. However, there’s another reason why acting a little bit mysterious can help you with your game. Girls are immediately turned off by guys who talk too much.
Even if you have a lot of things to say about the food you’re eating, try not to let it overwhelm both you and your date. Besides, girls are more impressed when guys appear to be listening to them talk, as evidenced by small comments every now and then.

search terms:-


How To get Your Business organised


  •  Invoices and  Tax returns It’s one of the less creative sides of craft selling, but paperwork is a crucial area of your business. Katie Plant at Shropshire Petals confirms this: “A strong, organised invoice system is vital to any company. If accounts aren’t organised, it can waste vital time,” she says. Yvonne Ruhle at Kit & Kaboodle has developed a simple yet effective system.   “For me, the easiest system is to use what I call ‘dump boxes’. When I open my mail, I put invoices into the box so nothing is mislaid. Then every Friday, I check and action the box’s contents and file everything accordingly.”


  •  Record orders Perhaps every craft seller’s worst nightmare is losing a customer’s details. The best way to prevent this is to create a system that tracks outgoing and incoming orders in an order book or spreadsheet. Laura Pyke at sayithandmade.co.uk says: “Add each order to your order book as soon as it comes in along with its shipping date, then cross them off once they’ve been posted. It’s also a great time saver to keep your suppliers’ details in one place so that you can order materials quickly the next time you need them.” 
  • Be arty with storage Emma Read at Hapitat Hats is creative about how she organises materials, so that even her storage looks good: “I have all my fabric, feathers and lace stored in individual vintage leather suitcases – they look lovely on shelves stacked up, but they also look gorgeous taking them out to show customers the fabric choices. They look great on my craft stall,” she says. Vicky Craxton at vickysvintagegifts.co.uk has an inventive money-saving idea for your workspace: “Use empty biscuit tins, clearly labelling them so you can find what you’re looking for quickly
  •  Keep tools handy Yvonne Ruhle, at Kit & Kaboodle found that she wasn’t being efficient before she got her tools and work table sorted: “I found I was buying things that I already had, but simply couldn’t put my hand on. So now, materials and tools I need regularly are housed in simple boxes close to my work bench.” Laura Pyke at sayithandmade.co.uk agrees: “If I can’t put my scissors away without standing up, I know they will end up staying on my work table and get lost among the clutter. Desk organisers, sets of table-top shelves and wall hooks are great ways to store things while keeping them accessible.”

  •  Space savers Michelle Kreussel at The Fox in the Attic creates her own fabulous vintage space savers: “My studio is in the basement of our house. I have an antique chest of drawers that is perfect for storing all my templates and fabric. I label each drawer with what goes inside. I also bought a Victorian tea trolley to keep my fabrics nice and flat.”     Jojo at Lovelyjojos.com goes one step further with her storage solution and rents a storage unit: “This works out cheaper than buying small amounts of things,” she says. 

  • Packing centre Make packing and posting a quick and savvy operation. Camilla Westergaard at butterscotchandbeesting.com has this down to a tee: “I have a huge pegboard in my studio where I hang all my packaging paraphernalia. I keep all my scissors, string and Washi tape there and it even has room for my bubble wrap. It makes packaging up parcels super-easy (and a bit more fun, too).”
  • Get technical Create a system on your computer to stop paper piling up in your workspace. Jojo at Lovelyjojos.com says, “I keep track of expenses as I go, logging them on a spreadsheet and filing them by month on my laptop. I then do my income at the end of every week. That way, when tax return time comes, I don’t have loads of catching up to do.” 

Display ideas and to-do tasks on pin boards for workspace inspiration 
  • Keep tools handy Use pin boards to display all your precious new ideas. Katie Plant at Shropshire Petals says that her team couldn’t function without them: “Notice boards are perfect for keeping track of all those pesky (but vitally important) sticky notes! It’s important to make your working space creative so you’ll be more likely to generate lots of ideas while  you work.”  
  •  Fair organisation          Get a slick system together for an organised fair day, like Sean Carter from aberfanturning.co.uk: “I have the same  layout at my weekly fair, so it’s easy to remember. I also set things up and pack things away in the same routine every time so that I’m quick.” weatherproof boxes too!”  
  •  The budget Without keeping records of what you spend and the money you make, how can you see if you’re making a profit? Camilla Westergaard at butter scotch and beesting. com relies on a pricing spreadsheet: “I list all the costs of each product, the time taken to make it, the wholesale and retail price and the profit. So if any costs change, the spreadsheet will say if the retail price needs to be altered.” 

How to make the lace necklace


  •  Carefully cut off one of the individual sections of the lace trim by snipping the thread bars between the elements. Look carefully at the lace and find a part of the motif to form your bib shape necklace. You may need to turn the lace upside down.
  •  Once you have selected a section, cut other pieces of lace to fill in some of the gaps. You may want to extend the main section with a small motif, like we did with the tulip shape on the top left of our necklace, to create a better shape. 
  •  Turn all the different elements over and lay them onto a plastic sheet. Use a small paintbrush to paint around the edges with the fabric stiffener; only lightly brush over any lacy areas so that you don’t fill in the gaps. Allow the stiffener to soak in and then leave it to dry completely.  
  •  Begin to fill in some of the larger areas. Position the small motifs into the gaps and stitch the pieces together where they touch using a matching colour thread. Use a few small oversewing stitches and then catch the thread into the lace so it's invisible, then move to the next area that needs stitching. Sew in the thread ends. 
  •  Sew the larger motifs into the top edge of the lace to create the classic triangular bib shape. If you find that the lace is still floppy, then paint another coat of fabric stiffener onto it. Once dry, lay the lace  bib between two sheets of greaseproof paper and press with a hot steam iron. Leave flat until cool. 
  •  Open a 6mm jump ring and feed it through the lace bib at the corner of the top right edge. Measure across the bib and attach another jump ring to the left side at the same position. Cut two lengths of gold chain measuring about 17-20cm (7-8in) long, and attach one to each jump ring and close again. Check you are happy with the length, then attach a lobster clasp to the end of the right chain and a 4mm jump ring to the end of the left chain, to finish
Materials Needed


*  Corded guipure lace trim 11cm (8in) wide, ours is from  OrientalDirect.co.uk *  Antique gold chain, 40cm (16in) *  Jump rings, 4mm and 6mm *  Lobster clasp *  Fabric stiffener *  Paintbrush *  Plastic sheet *  Ivory cotton thread
Size: 12 x 7cm (4¾ x 2¾in) 


Skill level: Easy


How to sell your Handy Robots


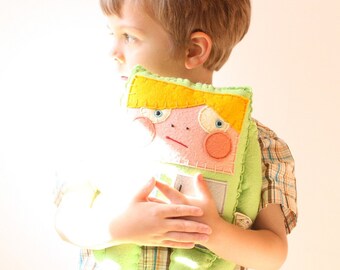
  • Appeal to the collector in your customer. People love a collectable, so create a whole cyborg family in different styles and colours, each with their own name and back story, and you’ll soon be selling your robots in sets.


  • 2Get social media savvy by creating a Facebook or twitter account for your robots. Post updates on new characters and let followers know when old ones find a new home. It’s a great way to get feedback on your makes too, so invite comments from customers to help you improve your future makes.


  • Happy snaps! We say it all the time, but it’s so important to photograph your makes well. Shoot your robot in situ, so shoppers can see how to use him, and always take pics in natural light.

  •  Keep the styling simple. As our robot is brightly coloured with lots of fun touches, it’s best to display him 

Use our handy hints and tips to make  sure your robots fly off the shelf
on a calm, neutral background, such as a white shelf or wooden bookcase. This way the colours and details will really stand out, ensuring customers can see him at his best.


  • Offer a professional service. If selling your robots online, then email customers to confirm their order, inform them of the dispatch date and let them know the method of delivery. 

Remember to include accurate measurements in your online listing, as it’s hard to see how tall Sparks really is in a photograph. The more information you can give to the customer, the more confident they will feel in purchasing from you.


  •  Be easily searchable. Think carefully about search terms that people might use to find your makes. List your robot online under headings such as ‘gifts for him’, ‘birthdays’, ‘gifts for tech lovers’ as well as ‘Sparks the robot’ and ‘handmade’. 


It’s all in the packaging! Don’t just bag up your robot or stuff him in an envelope. Use bubble wrap and a box to protect him in the post. If you’re selling at a market, then each one wrap in tissue paper closed with a branded sticker, then pop in a gift bag for a professional touch.


  • Parental guidance. This fun character is going to appeal to young children, so you need to be clear when selling that he is not intended for the use of children. Put up a sign near the display on your craft stall, or include this information clearly on the robot spec on your website. 


  •  Just for fun! Create a buzz online by encouraging customers to post photos on your Facebook page of their robots in their new homes. We’re sure everyone will want to join in the fun